Have you ever wondered what guitar neck relief is and why it’s important? Well, you’re in the right place!
In today’s article, I’ll uncover the meaning of neck relief, discuss standard settings, and explore how they can vary for different guitars. Because understanding this concept and learning how to make conscious adjustments can significantly impact your playing comfort and overall enjoyment. So, let’s dive in and unlock the secrets of the bowed guitar neck together!
The importance of guitar neck relief
The neck of your guitar is like a mini landscape, with curves, bends, and contours. It may seem like a small detail, but trust me, it can make a difference in how your instrument feels and plays.
Here’s the deal. The topography of the neck, specifically the amount of relief it has, affects several key aspects of playability. Let’s break it down:
- String play: When the neck has the right amount of relief, the strings have enough room to vibrate freely without buzzing against the frets. This means smoother, cleaner, and more precise notes as you play those sweet melodies or shred those killer solos.
- Intonation: Ever played a chord that sounded off, even though you knew your fingers were in the right place? Neck relief can impact the intonation of your guitar. When it is properly adjusted, it helps maintain accurate intonation across the fretboard.
- Overall playability: Imagine gliding your fingers effortlessly along the fretboard, only to be met with resistance or unevenness. Properly selected neck relief creates a comfortable and consistent playing surface.
Now, let’s talk about the importance of maintaining the appropriate size of neck relief. Too much relief can cause the strings to sit higher off the fretboard, resulting in higher action and making it harder to press the strings down. On the other hand, too little relief can cause the strings to buzz against the frets, leading to a frustrating and unpleasant playing experience.
By keeping the guitar neck bow within the recommended specifications for your instrument, you can prevent buzz, string irritation, and other playing problems.
Standard neck relief settings

When it comes to guitar truss rod adjustment, there are some general guidelines to keep in mind.
The commonly recommended amount of relief is typically measured in thousandths of an inch or millimeters. For most guitars, a standard neck relief falls between 0.010″ to 0.014″ (or 0.25mm to 0.35mm). This range ensures a good balance between playability and avoiding unwanted fret buzz.
I recommend experimenting and finding the sweet spot that suits your playing style and personal comfort. If you’re unsure, starting with the standard range is a good baseline. From there, you can make subtle adjustments, gradually increasing or decreasing the relief until you find what feels right.
Neck relief adjustment techniques
Now, I want to share some user-friendly tips on adjusting neck relief to fine-tune your guitar’s playability. Don’t worry if the term sounds intimidating – it’s quite simple once you get the hang of it.
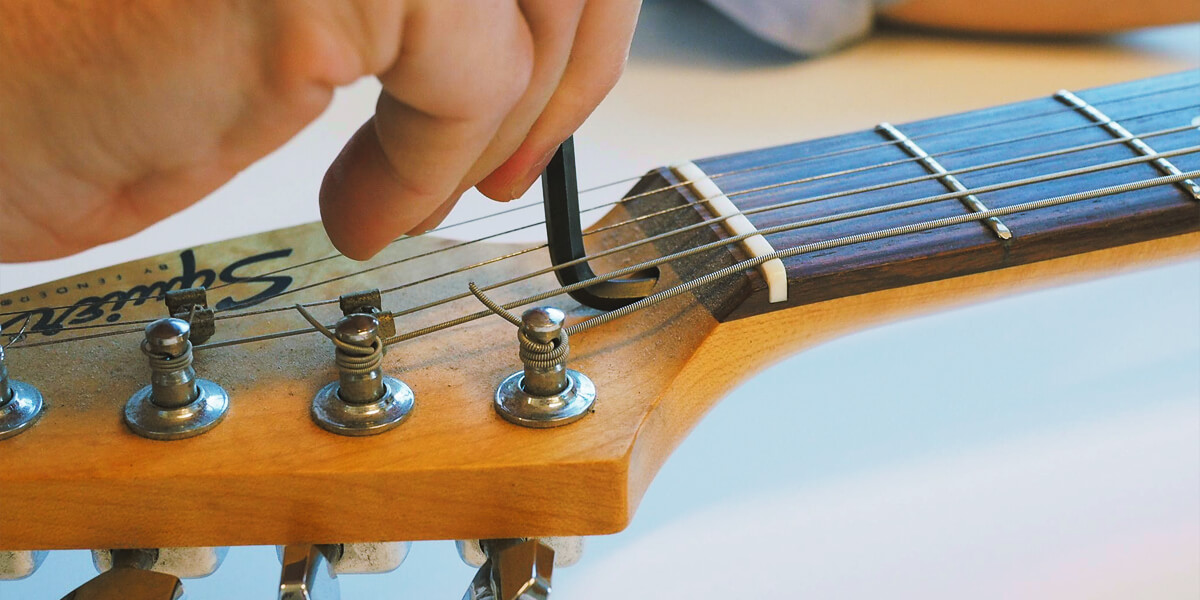
- Gather the necessary tools: To adjust the neck relief, you’ll need a suitable truss wrench (also known as an Allen wrench or truss rod wrench) that fits your guitar’s truss rod nut.
- Assess the current neck relief: Using your capo, press down the first fret of any string (let’s use the low E string as an example) and simultaneously hold down the highest fret on the same string (e.g., the 17th fret). Then, observe the gap between the string and the frets around the 7th to 9th fret area.
- Determine the necessary adjustment: Ideally, there should be a slight gap (around 0.010 to 0.020 inches) between the string and the frets in the middle of the neck. If the gap is too large, you’ll need to increase neck relief; if it’s too small or nonexistent, you’ll need to decrease it.
- Making minor adjustments: Locate the truss rod adjustment nut, usually situated at the headstock end of the neck. Insert the truss wrench and turn it clockwise to increase relief or counterclockwise to decrease relief.
- Test and fine-tune: Once you’re satisfied with the neck relief, strum some chords and play different frets to test the playability. Listen to any buzzing sounds or note inconsistencies.
If you’re unsure or uncomfortable adjusting the neck relief yourself, it’s always a good idea to seek assistance from a professional guitar technician.
Neck relief variations across guitar types

You may have noticed that not all guitars have the same neck shape and feel, and that’s because they’re designed with different playing styles and musical genres in mind.
Acoustic guitars
Due to their larger bodies and higher string tension, acoustic guitars generally require a slightly higher amount of neck relief compared to electric guitars. If you’re working on an acoustic guitar, remember that adding relief to the neck may be necessary to maintain optimal playability.
Electric guitars
The design of electric guitars often includes an adjustable truss rod, which allows for precise adjustments to the neck relief. Find the right balance of relief for electric guitars to ensure smooth action and prevent fret buzz.
Classical guitars
Classical guitars have a wider neck and a different construction than acoustic and electric guitars. They typically have a flat fingerboard and a different bracing system, resulting in a different playing feel. Such instruments generally require a small amount of neck relief, as their nylon strings exert less tension on the neck.
Armed with this knowledge, you can confidently embark on your guitar journey. Happy playing!